Tipro MID Keybaod Pinouts

July 18th, 2015 by Alistair MacDonald No comments »

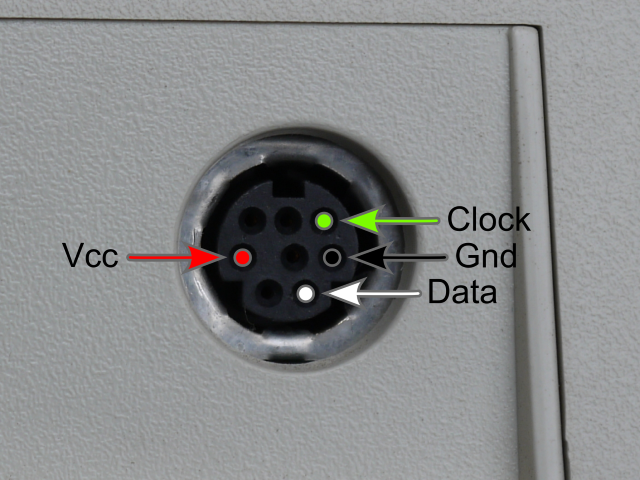
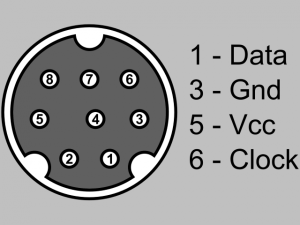
Tipro MID Keyboard Pinouts (Diagram)Over time I have ended up with a couple of customisable Tipro MID keyboards without the custom lead to connect them to a PS2 port. These leads are no longer available for sale so I decided to figure out the pinouts. This is a quick summery of that work.

As the keyboards have a pass-though port for other PS2 devices and were unlikely to have a common ground and 5V line I could use a multimeter to check what was the “Gnd” and “Vcc” easily. This worked and I had those figured out after a few minutes.

Now I had the power sorted I just had the clock and the data pins to figure out. I realised that there were only 30 possible combinations and the keyboard were already programmed so would behave like, well, a keyboard when a button was pressed. Rather than mess bout I decided to just try all combinations and to wee what one worked. There was a remote change this could damage the hardware but that was very very unlikely and I had little to loose. As luck would have it it worked on the 3rd attempt.

So now we have the results. The layout is not dissimilar to that of a a PS2 connector albeit mirrored. Hopefully this will be of use to at least someone and save some hardware from the skip.

Tipro MID Keyboard Pinouts (Photograph)

My next challenge is to reconfigure them. The configuration utilities (MIDWIN and MIDDOS) are still available from the Tipro drivers archive although it is recommended you use Windows 95, 98 or 2000. Wish me luck.

Arduino Pro Mini / Lilypad pinouts

May 3rd, 2015 by Alistair MacDonald 1 comment »

I have been using the Arduino Pro Mini and the Arduino Lilypad recently with an external programmer. As I normally use a generic USB programmer and need to connect each pin manually I am continually looking up what needs to be connected where. This is a table of connections to make this easer.

Name Arduino
Lilypad
Arduino
Pro Mini
FTDI Cable FTDI Cable
Colours
Budget
Adapter
Budget Cable
Colours
Ground B GND GND Black n/c n/c
Ground GND CTS Brown GND Black
VCC VCC VCC Red VCC Red
Receive RXI TXD Orange TXD Green
Transmit TXO RXD Yellow RXD White
Reset G Reset RTS Green n/c n/c

433MHz Antenna Lengths

December 19th, 2014 by Alistair MacDonald No comments »

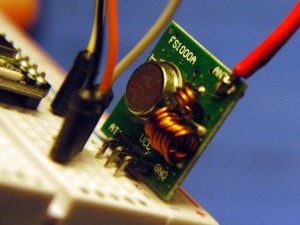
I use a cheap 433MHz transmitter modules often and every time I need to work out what antenna length I should use because I never write it down. This blog post is me writing it down. The length needs to be an harmonic of the wavelength. The wavelength is speed of light divided by the frequency, or 299,792,458 m/s divided by 433,000,000, or 692.361334873 mm for short.

So the acceptable lengths are…
433MHz Transmitter Module

  • 692.36 mm
  • 346.18 mm
  • 173.09 mm
  • 86.545 mm
  • 43.273 mm
  • 21.636 mm
  • 10.818 mm
  • 5.4091 mm
  • 2.7045 mm
  • 1.3523 mm
  • 0.6761 mm

In reality I normally go for 87 mm, or 43 mm if I am tight for space and don’t need a strong signal. I did once use a 17.3 cm antenna and the coverage was amazing.

What version of Ubuntu am I on?

November 12th, 2014 by Alistair MacDonald 1 comment »

This is a question that I ask myself a lot and keep having to look up almost every time. Sometimes I am not certain what distribution I am actually using. Here is the summery version that hopefully will save me having to look the command up each time, and perhaps help you as well.

To find out all the version information about the Linux kernel you are running run the command…

uname --all

To find out the OS release (such as the Ubuntu version) have a look in the os-release file…

more /etc/os-release

…and on most systems you can look at that same information neatly formatted using…

lsb_release

Spectrum Emulator (full screen) on the Raspberry Pi

August 10th, 2014 by Alistair MacDonald 1 comment »

As part of my ZX Keyboard project I wanted to run a Spectrum emulator in full screen on the Raspberry Pi.

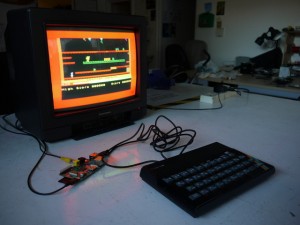
Fuse Spectrum emulator running on the Raspberry PiThe good news is the Spectrum emulator Fuse has already been ported to the Raspberry Pi and is easy to install if you are using Raspbian. The bad nest is that all the guides I found were to install the “GTK” version that runs under X windows, and I wanted to run in full screen on an old CRT TV. To install the Fuse “SDL” version (that will run in full screen from the command lane) just log in and from the command line run the following command…

sudo apt-get install fuse-emulator-common fuse-emulator-sdl fuse-emulator-utils spectrum-roms

Next we should make it start in full screen. From the console type in “fuse-sdl” and the emulator will start. Next press F1 (yes, sorry, the ZX keyboard does not have an F1 key so you will need to use another keyboard for now), select “Options”, and “Full Screen”. To make this the default press F1 and select “Options” again, then select “Save”. To exit use the F10 key.

Now I think we will need a good old game to play. The best place to look for Spectrum games that are distributed legally is at http://www.worldofspectrum.org/ . The simple way to load a game using the ZX Keyboard is from the command line. For example we can load Manic Miner (assuming we downloaded the game and extracted it to the working directory) with the following command.

fuse-sdl –tape “Manic Miner.tzx”

Annoyingly I have come across one problem with Fuse and the ZX Keyboard. Fuse maps each key to a Spectrum key, letter to letter, number to number, shift becomes Caps Shift, and Ctrl become Symbol Shift. All other keys are ignored. This is a problem as we are interpreting and translating the symbols already. For example the Symbol Shift P as a double quote (a shifted 2), but the emulator treats this as the Caps Lock being pressed. We could make the ZX Keyboard work flawlessly by turning off our translation, but we would lose compatibility with PC software. I might look at building in a way to changing modes but we will have to cope with this for now.

ZX Keyboard

July 31st, 2014 by Alistair MacDonald 27 comments »
A ZX Spectrum converted in to a USB keyboard on show at Manchester Mini Maker faire.

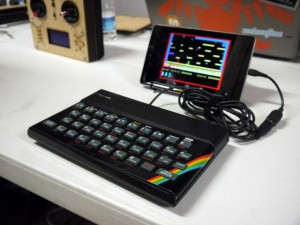
The ZX Keyboard, a USB keyboard made from an old ZX Spectrum on show at Manchester Mini Maker Faire.

Several year ago I decided that I wanted to make an old ZX Spectrum keyboard work with an emulator and ended up making one in to a USB keyboard. This is the rather waffly history of the project with a few tips and links for building your own. I have also created a Hack a Day page for the basic build instructions and a GitHub repository for the files.

Although I have never owned a working rubber keyed ZX Spectrum (mine was a Spectrum+ with a more solid tactile keyboard) I was given a broken rubber keyed one many many years ago. It was in a bit bashed up and did not work, and I have used a few of it’s components to fix other machines, but surprisingly the keyboard was okay.

Back in the start of 2012 I wanted to mount a soon to be released Raspberry Pi inside and emulate a full ZX Spectrum, as well as a Commodore 64 just to mess with people’s heads. I waited until the Model B was Pi eventually available but it would not fit without making more modifications than I wanted, and the smaller Model A was a long way off becoming a reality. I then decided that instead of mounting the Pi inside I should turn it in to a USB keyboard so I could use it with a Pi or a normal desktop PC. Naturally I then forgot about it for another couple of years, until for some reason just now.

Several people have asked why I did not use Bluetooth (some more criticising that asking, but whatever) and there was a Kickstarter making new Bluetooth ZX Spectrum style keyboards, but the project was to use an original ketboard, get it working with the Pi, and to do it myself.

Anyway, the build…

The hardware was surprisingly easy with the big unknown being the USB communication to which I considered a few solutions. Lots of projects use  a Arduino Leonardo that can natively emulate a USB keyboard, or reprogramme the Arduino Uno’s serial controller that requires zero extra hardware, but will prevent the Arduino from being programmed via the USB port. I was keen to use a low cost (the one used cost £1.30) Arduino Pro Mini clone and a small number of basic components.

Having decided on the Arduino Pro Mini (yes, I have my cart pull the horse for pet projects) the easy solution (for me because of prior knowledge) was to get the Arduino to emulate a PS2 keyboard and use a cheap PS2 to USB converter. If it was a one off commercial project, or I was against the clock then this is what I would do as it is the quick and easy solution that adds pennies to to cost of the project. This however is a daft pet project that is an ideal excuse to use as a learning experience, so I decided to play with the V-USB library from Objective Development.  In the end I found the VUSB for Arduino library that had done a lot of the porting work for me, although I am bypassing the top levels of the library to increase compatibility and allow multiple keys to pressed. Now I have thins knowledge my default may well be to opt for USB for future projects.

Connecting to the keyboard hardware was easy enough as I reused the original connectors from the old motherboard that already had components missing. The flat cable from the membrane was very tarnished and had cracks across the connections but I chopped an inch off the end and this solved the problem. The connections have been well documented by hobbyists over the years so there was no backwards engineering required. The way it is wired to the Arduino is not just to make things look neat mind. I will also help the software. Instead of having to check each button of each column at a time it is arranged so multiple values can be read in an operation.

The key mapping took a lot of thought and I have tried to make the keyboard usable for normal operations while keeping full compatibility for Spectrum Emulators. I think I have managed that and have written a little about how it works on the hackaday page mentioned at the top of this post.

So that is it. I will be taking the keyboard to future hack days, Bar Camps, and Mini Maker Fairs if you would like to see it. I hope you are inspired to have a go at building one, perhaps a better one than mine. Do let me know if you do. If you want one but don’t have the time or skills to convert your old ZX Spectrum (or any other machine for that matter) then I am happy to do it for a few quid so get in touch.

Update: It appears that the latest Arduino IDE (version 1.6) will not compile the VUSB library because of an old big in it. A quick work around is to install an older version of the Arduino IDE. It works for me with version 1.0.5.
Scratch Bikes Data

July 13th, 2014 by Alistair MacDonald 1 comment »

Scratch Bikes in Newcastle

In this post I reveal a little secret about Newcastle’s now defunct cycle hire scheme and make the cycle location data collated over two years available.

Until the end of 2013 Newcastle had a cycle hire scheme called Scratch Bikes operated by Grand Scheme (formally both WhipBikes Ltd and Scratchbikes Ltd). Back in 2011 I decided to use the cycle location information on the Scratch Bikes web site to make an amazing animation like the animation done using data from the Boris Bikes in London. Sadly I found that the data was anything but live so I could not.

When I pointed out the web site and phone app were inaccurate Scratch Bikes were quite honest and came clean that the numbers were in fact entered manually when the bicycles were checked at the start of the day. I did offer to help link the systems together but sadly they did not respond to my offer. They did however try and hire a friend instead but I guess they had their reasons.

So the data…. In 2011 I set up a server intermittently checking the Scratch Bikes web site to find out how many cycles were at each station. As mentioned the data only changed once a day and was not enough for my needs, but I had already coded up the scraper to discover this so decided to leave it running just in case it was useful. This ran continually for 2 years. I do not know if it is useful.

You can download the Scratch Bikes Usage Data here. The time stamp is from the site and appears to be the time when the data was entered on to there system. There is a separate table with the location information in. One note is that I do not have the official data for Malcolm Street and Cuthbert House (presumed to be 3400 and 3405) so I have made a best guess. If you can fill in the blanks then please get in touch. Please take the data and do cool things with it, and let me know what you do with it.

I will just close by saying that reimplementing the phone service and building a web service is not hard for someone like me to do. In fact I can have it up and running within a couple of weeks, the web site and app will be live and accurate, and you would be able to book out cycles by text, voice, from a smart phone, and a PC as well. If someone wants to team up make this happen again in Newcastle then get in touch.

Where are the comments?

February 16th, 2014 by Alistair MacDonald 1 comment »

Recently this blog has been the target of a silly amount of spam comments and I am having trouble keeping it up because of that, so I have disabled comments for now.

4 years ago my blog received about 200 spam comments a month caused me to install Akismet. The spam continued to increase slowly until it got to an average of 2,000 comments a month. Even with this number Akismet was doing a good job and blocking almost all of it, leaving just a handful of comments for me to moderate manually.

Annoyingly things have rocketed now and last month I received 68,897 spam comments. That is around 90 spam comments every hour. This I could still cope with easily, but they tend to come in short waves and I am having trouble keeping my site responsive when that happens. If you have experienced an unexpected wait for up to 20 seconds and them the site just works again, then this is why. Ironically it is using Akismet that is causing the delay, but not using something like this would be clearly be impractical.

The truth be told I do not blog as much as I did, and that most people interact with my blog externally on Twitter and Facebook instead of the comments, so I have just disabled all comments for now. I am considering using nginx instead of Apache to better cope with this kind of traffic, or using a service such as Cloud Flare, but for now I hope disabling comments will keep the site fully responsive all the time.

Update: I am experimenting with some WordPress plugins to block some bot nets before Akismet is called. Fingers crossed this will reduce the spam to a level that my server and Akismet can cope with again. Very few users should be blocked in error but if they are then they can click back, wait a minute, and try again.

Fancy another laugh at my expense?

January 30th, 2014 by Alistair MacDonald No comments »

Bright ClubWell this is your opportunity on Tuesday evening.

A couple of year ago I preformed at Bright Club Newcastle, a “geek” style stand up comedy night. Well for some odd reason I have been asked back again. I guess they are desperate. Anyway, I will talking about my pet plastic duck on Tuesday 4th February.

If you want to come along there are details on the Centre for Life web site.

SnapCam to Close

December 21st, 2013 by Alistair MacDonald No comments »

snapcamlogoSnapcam is a simple Windows web cam application and web service I produced in 2003 as a pet project. It simply took an image at a set interval and uploaded it to the web service. The (almost) live image could then be embedded in the user’s web page. It is now outdated and sadly I need to close the free service down.

It was designed to be very easy to install without a complicate signup process, and it initially ran entirely on a free hosting service available at the time. Use has fallen away over the years as most people have move on to a more modern web cam solutions, or stopped completely. Today I don’t feel it worth updating the software or moving the service on to new hosting that I need to do. I am really pleased people found and used the service useful over the last decade and part of the code does live on in some time lapse experiments.

New users have not been able to start using the service for a while, and current users should have been receiving a warning message through the software. The service will stop functioning on or after December 24th 2013. If you wants to keep using the service after that date then please get in touch and I will see if I can come up with a low cost solution for you.

css.php